Use the following URL to navigate to the login window: https://www-p107.intacct.com/ia/acct/login.phtml

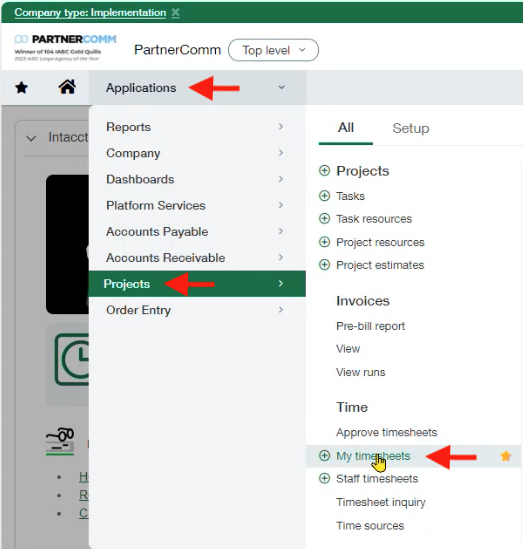
- At the Home page, click on "Applications"
- Select "Projects" from the drop down menu
- Then click on "My timesheets" under the "Time" section
- On the next page click on the "Create a new timesheet" button at the top right of the screen, or in the middle of the screen if you have no timesheets already showing

- This will bring up the "Create timesheet" dialogue window with the "Description" box. Here you'll need to enter "WE MM/DD/YY" this will be the Week Ending date for that specific timesheet, then click "Create Timesheet"

- On the new page you'll have a couple of ways to search for your "Project" which is required before you can search for your "Task." Once you click into the "Project" field you can start typing the name of the project to have it narrow the search down to matching project names. You can also use the drop down arrow instead and scroll throw the available projects. Select the project you're wanting to add

- You'll repeat this step but this time focused in the "Task" field

- After you've filled out both the "Project" and "Task" fields, you can no continue on to enter time in for that project. This will allow you to enter the amount of time you worked on that Project Task each day of the timesheet week

- Here is an example of what a completed row entry would look like

- You'll notice after entering time an icon will appear, click that icon each time you add time data and that will bring up the window for you to enter a note for that time. You must add information into each days time entry with information about what you were working on


- IMPORTANT: these notes entries will typically appear on invoices that clients receive
- Your timesheet will save automatically as its updated, so no need to look for a save button each time you enter time. Once you've completed entering all your projects, tasks, hours, and notes you'll click on the "Submit timesheet" button at the top right of the window

- If you want to add time each day then you wouldn't click the submit button until all your time has been entered for the corresponding week. Each day when you get to your "My Timesheet" page you'll see your timesheet draft waiting for you

- Click on that timesheet line item and it will take you into that timesheet so you can add additional time
- There are additional options for managing your timesheet that you can find after clicking the 3 vertical dots at the far right of your timesheet line item including the options to duplicate and delete the timesheet
Was this article helpful?
That’s Great!
Thank you for your feedback
Sorry! We couldn't be helpful
Thank you for your feedback
Feedback sent
We appreciate your effort and will try to fix the article